I have been writing posts for many years, but I wanted to combine them into just one post to make it simple for people making Gbiota boxes. I include sections on Gbiota beds to help explain the Gbiota principles, but these are a bit more complicated and tend to be used by people with a higher skill level.
You can still view the original posts in the growing section.
I run a commentary on the posts in red.
Growers and the Gut Biota
This is an early post but is good for explaining the Gbiota principles.
Microbes breed in the soil and enter plants, which then act as natural pre- and probiotics. When we eat these plants, they help form our gut biota.
This process is the result of millions of years of evolution, so we know it works. But there are also harmful microbes and pathogens which lead to infectious diseases and can make us sick or even kill us.
Beneficial microbes form our “gut brain”, which helps regulate our bodies, particularly how we store fat and where we store it, supporting a long and healthy life span.
Unfortunately, modern food does not feed our gut brain. This is one of the underlying causes of the modern epidemic of diabetes, heart disease and dementia.
In the Gbiota system, we carefully regulate the conditions so that beneficial microbes outcompete and outbreed the harmful microbes.
The beneficial microbes need a combination of nutrients, water and air.
Beds, Boxes or Combo
If you have a garden, you can choose between Gbiota beds, Gbiota boxes or a combination of both.
Beds have the advantage of much higher productive area and a natural migration of the creatures of the earth.
They are also great for creating Wickimix to go into boxes.
I will give a brief overview of beds here, but most people, particularly city dwellers, will use boxes – beds are mainly to get the idea over and to show the principles.
Gbiota Beds
We breed the beneficial microbes in raised beds with a subsurface ag pipe.
“Soil blood” – a combination of water, nutrients and microbes – is stored in a sump.
Soil blood drains out of the beds or boxes and is full of living creatures and nutrients. It fulfils the same function in the Gbiota beds as blood does in our bodies – transporting air, beneficial microbes and nutrients around the system. Pretty important stuff.
We pump the soil blood into the ag pipe at relatively high flow rates so it creates a pressure which saturates the surrounding soil before it has time to drain away.
These two basic principles of flood and drain (so the soil breathes) and circulating the soil blood are critical in the Gbiota system, ensuring that the organic matter does not become putrid.
The end of the pipe rises over a leaky dam which allows the soil blood to build up pressure and then lets excess soil blood return to the sump.
The area just above the ag pipe is loaded with organic waste which feeds the microbes.
It is then covered with soil, minerals and inoculants, then seeded with either food crops or green manure crops. These plants exude nutrients which attract the beneficial microbes.
After a period – typically a few months – the organic waste will have decomposed to create a living, highly nutritious soil.
Soil blood is pumped into the bed, expelling any stale air.
Excess soil blood drains back into the sump through the leaky dam.
As soil blood leaks back through the leaky dam, it returns to the sump and fresh air is sucked back into the soil.
The soil is literally breathing, and the soil blood never becomes stagnant.
With the right conditions, the beneficial microbes outbreed the harmful ones.
Eco-balance is the basic principle behind the Gbiota technology.
Gbiota Boxes
Our long-term aim is to have a network of operations supplying boxes with food ready to eat, but we are not there yet.
The living soil is placed into Gbiota boxes and seeded to grow food plants which will act as natural pre- and probiotics.
Growers sell these boxes to their customers so they have living plants growing at home.
This is important as microbes have a short life, so the plants must be eaten shortly after harvesting, before the microbes die. Harvested plants may take some time before they go rotten, but the beneficial microbes will have died well before that.
When the customer has finished eating their plants, they can swap their empty box for a fresh box.
Customers and growers develop a long-term relationship. Customers have healthy plants growing at home and can look forward to a longer and healthier life, while growers have a viable business providing a valuable service to their local community.
Why “In-Soil” Composting?
Breeding beneficial microbes is a key part of the Gbiota system – this section explains why we use “in-soil” composting.
 Breeding microbes is easy – we have been doing it for years by composting.
This is important because if we are to survive as a species, we have to recycle organic waste.
Hot composting is a sophisticated process that effectively recycles organic waste while killing off most of the pathogens. But it does require careful balancing of ingredients with the right carbon-to-nitrogen ratio, and turning to ensure adequate air.
The high temperatures – typically well over 60 °C – kill off the pathogens. Unfortunately, our guts do not operate at 60 +°C, so hot compost is not ideal for breeding gut biota.
Cold composting typically ends up as a horrible smelly mess riddled with pathogens, so we need a different approach – using the creatures that naturally live in the soil.
 Worms are highly efficient recyclers, but there are numerous other creatures: beetles, sow-bugs, soldier fly larvae and many more we can see, and under a microscope, soil is teeming with microscopic life.
This is a different approach from simply “adding microbes” to process the waste. Instead, we use creatures to consume the waste, which they process using the microbes in their guts – very similar to the microbes we need in our own guts.
Virtually anything organic can be processed by burying it in the soil, as there will always be some creature that will consume the waste. Even wastes like orange peel will be reprocessed by fungi.
This is a much better method for breeding gut biota. The only disadvantage is that it is slower than high-temperature composting, but that is not a real issue as the soil above can still be used for growing plants to eat.
Gbiota Beds and Boxes – Adapting to Climate Change
Gbiota beds were developed many years ago and remained stable in design. However, climate change and recent floods required a rethink.
Gbiota Beds and Boxes – Same Principles, Different Mechanics
We use the same principles in both Gbiota beds and boxes – partial flood, then drain, and recirculate – but we apply these principles in different ways.
Beds
 Gbiota beds are, as their name suggests, in-ground beds. After major flooding from climate change, I now use raised beds, so they are really “on-ground” beds.
They have several advantages. Technically, they encourage a wide range of creatures to enter the system.
I talk a lot about microbes (which are incredibly small and have short lives) and fungi (which can be incredibly large – the largest single organism can extend over several kilometres), but the mid-sized creatures are also incredibly important to a living ecosystem.
These creatures – worms, soldier fly larvae, beetles, slaters, sow bugs, spiders and more – all have a gut, just like us, to digest their food. Since we are trying to breed microbes for our gut, they are an important part of the scene.
These creatures naturally find their way into the Gbiota beds; we don’t have to do anything special – they just come.
In previous posts I showed a plastic liner, but that prevents the local soil life from entering the bed. I have found that on my block – a duplex soil with silt over clay – if I compact the soil (banging with a big hammer) it works fine without a plastic liner. I suspect that on a sandy soil a layer of clay may be needed to stop excess leakage.
Boxes
 Gbiota boxes are a lot smaller so they don’t have the production capacity of beds, but they have one big advantage: they can be used at homes without a garden to grow Gbiota plants.
This is incredibly important. Microbes work on a different time scale to us. I use the rough ratio that one hour of a microbe’s life is equivalent to a year of human life.
If you buy a vegetable from the supermarket, it will have been grown in soil where nutrients are provided by chemical fertilisers; there will be minimal microbial life in the soil and hence in the plants.
What little there is will usually have died by the time the vegetable ends up on your plate.
The overriding advantage of the Gbiota boxes is that they allow people – even with no growing skills – to have growing plants at home, which they can pick and eat before the microbes die.
This is a crucial part of the Gbiota technology.
Combo – Beds + Boxes
These are not competing systems. My preferred system is to use beds to create the living soil and then use this soil (Wickimix) in Gbiota boxes.
This is the system I use at home. If for no other reason, it is much easier to protect boxes from the invading insects which are an inevitable part of growing without toxic chemicals.
Selecting a Gbiota Box
There is nothing magical about the box. I know there are many “wicking boxes” on the market, often at high prices, but what matters is the soil, not the box – almost any box will work fine.
The main considerations are depth, size and UV resistance.
About the minimum depth for a box is 200 mm, and I doubt many people will be growing a giant red gum in a flat, so there is no point making it deeper than about 300 mm. Most of my boxes are around 250 mm, and even then I don’t fill right to the top.
There is a lot of nutrient in the Wickimix (the soil in the Gbiota box), so there is no need for a massive root system.
Many people make very large wicking beds (and Gbiota beds are just a version of wicking beds), but the reality is that the box is a closed system and the soil will deteriorate with time. This requires soil regeneration, which is much easier in a small box than a large one (see Gbiota 101).
My preference is for roughly a 30 litre box and leaving about a 50 mm air gap from the top. I can lift this with a level-1 grunt – but it depends how strong you are.
I am going to describe the Gbiota boxes as it is easier to explain how they work. Gbiota beds are based on the same principles but the mechanics are a bit more complex.
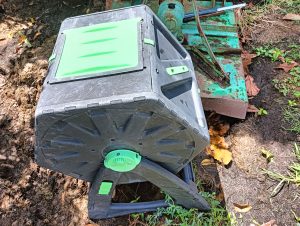
There is nothing special about the Gbiota boxes, they are just regular storage boxes you can buy from any hardware store.
They will be exposed to sunlight, so they should be UV resistant. Black plastic boxes are loaded with carbon black, which is a dirt-cheap way of making them UV resistant.
There are some UV-resistant clear boxes, but most cheap clear boxes will become brittle within a few weeks in direct sunlight.
Size is important, as they need to be transported and carried. A 20 litre box is about the maximum that can be easily handled, but I often just partially fill a 30 litre box which I can use as a terrarium with a lid for germination, then later drape a fly screen over the top.
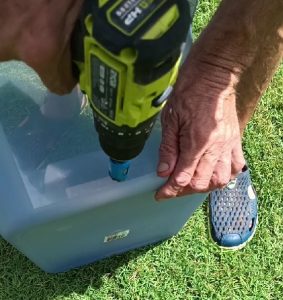
 I drill a hole in the side as low as I can, then use a rubber grommet and connector to make a swivel tube outlet.
 I cut a piece of slotted ag pipe to fit neatly into the base.
I used to just bend the ag pipe to make a filler, but now I either cut the pipe at 45° (and do the same with the vertical pipe) or just drill a large hole in the base pipe.
Either way allows me to view the water level in the base of the box, which is an important part of managing the system.
I have now stopped using this vertical pipe and instead use the compost tube for filling.
 I then fill the base of the box to about a third of the height (about 100 mm) with organic waste. Grass clippings are great, but use whatever you can lay your hands on.
On top of this I add a nutrient mix containing minerals, manure and trace minerals (typically available in blood and bone), and of course worms to process the organic waste.
In the ideal situation I will then fill the box with soil created in a Gbiota bed (Wickimix), but if that’s not available, any good soil or potting mix can be used as a starter.
I wet the box from above and then seed as normal.
Nothing much new here – it is the way we operate the box that is important.
Future Vision – Ready-Made Boxes
I hope that at some point, groups will form where people or companies supply boxes with plants already growing, so people in flats can just buy online without having to make the boxes themselves. But they will still need to know how to water the boxes so the beneficial microbes outcompete and outbreed any harmful microbes. This principle of eco-balance is a key part of the Gbiota technology.
Operating a Gbiota Box
I have to wait until the seeds have germinated and put down a reasonable root system before I start operating the box according to Gbiota principles.
 I set the swivel tube to the vertical (up) position and fill the box to the top of the swivel tube through the filler pipe.
This has to fit around normal living, so I typically do this over the weekend.
After the seeds have germinated and put down roots, I water from underneath.
I leave the swivel tube in the up position and allow the water (soil blood) to wick up to the roots of the growing plants. I do not top-water, but if the boxes are outside and it rains, the surface will be wetted.
I have recently started to foliar irrigate with soil blood (spraying it onto leaves) to increase the microbes in the plant.
 By mid-week – which is the maximum length of time I want the soil blood to be stagnant – I twist the swivel tube down and catch the soil blood in a suitable container (e.g. a recycled milk bottle) for reuse on the next cycle.
Most of the soil blood will drain out, but there will still be some left in the base. I wait until that has all been used up before refilling. This is why I like to be able to view the water level through the filler pipe (or now, via the compost tube system).
Flood, Drain and Circulation
 Think about what is happening here:
- When I flood the base of the bed, I am expelling the stale air that has accumulated in the soil from biological activity. Rotting organic waste can make growth inhibitors – and we don’t want that.
- When I drain the bed, I am sucking fresh air back into the soil in the box – I am “breathing” the soil.
- The soil blood is also aerated every time I cycle the system, creating conditions that favour beneficial microbes.
Reloading (Older Method)
When the crop has finished, I used to refill the box by putting the lid back on, turning the box upside down, lifting the box off and reloading with fresh organic waste – then flipping the old soil back into the box so the soil structure was not disturbed.
Note: with the success of compost tubes, this flipping method is no longer necessary.
Gbiota Beds – Construction and Operation
 Gbiota beds work on the same principles as boxes: partial flood, drain and recirculate – but the mechanics differ.
My strategy is to level the ground first. Hopefully, this gives me a bit of topsoil I can use later.
Then I lay out lengths of ag pipe in rows. At the filler end, I pack some soil so the pipe will finish above the final height of the raised bed.
At the other end, I make a leaky dam just a bit higher than the pipe thickness. It is sufficiently dense that it takes some time (hours) for the water to drain out when it returns to a sump below bed level.
A sump pump in the sump has a float valve, so when the sump is nearly full the pump automatically switches on and feeds the ag pipe from a manifold.
This floods the area around the pipe and, when the pump switches off, water wicks through the rest of the bed and drains back to the sump through the leaky dam.
Operation is similar to the boxes: wet the soil and seed as normal, then surface-water if needed until the plants have put down roots.
After that, irrigate from underneath using the subsurface pipes.
All pretty straightforward.
Making and Managing Wickimix
Boxes OK
 There does not seem to be much of a problem with making the boxes. They are just boxes you can buy from a hardware store. They do need a few holes drilled, but that does not appear to be a major issue.
Growing Plants OK
Actually growing the plants is usually not a problem either – many people are already growing house plants anyway.
The big issue is creating the Wickimix. The main input is organic waste – in an apartment this is typically food waste.
Nutrients OK
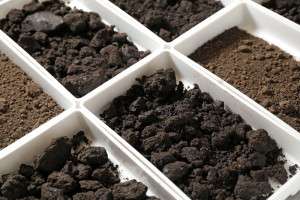
But Wickimix needs more than organic waste. It needs some soil, as most of the action is on the surface of soil particles. Clay is especially good because the fine particles have a huge surface area.
It also needs a source of nitrogen. Gardeners may have access to fresh chicken manure which is excellent, as it is full of microbes. It is also possible to buy processed chicken manure – this is clean but has lost many of the microbes.
 You can simply put out some bird seeds and the local birds will offer a free delivery service of fresh manure loaded with beneficial microbes. So simple no one believes me, but it works great.
Next, Wickimix needs minerals. A home grower may buy in bulk and store them, but an apartment dweller can still buy packets, and supplements like blood and bone can be readily purchased.
There doesn’t seem much alternative to buying these, mixing them up and putting them into a box that can be easily stored – no problem.
In addition, of course, we need worms, which are an integral part of the Gbiota system.
Pongy Food Waste – Not OK
 The real problem for the apartment dweller is how to handle the pongy food waste.
With a garden this is no problem – a couple of compost bins or rotating bins work fine – but having compost bins in an apartment is very not OK.
 The smell problem can be solved by sealed containers, but those pesky flies still seem able to smell out a delicious meal – at least in sunny Queensland where I live.
Two Experiments
Experiments over – compost tube won, but I still keep a box of Wickimix to top up the compost tubes after I add waste.
 So I tried two experiments.
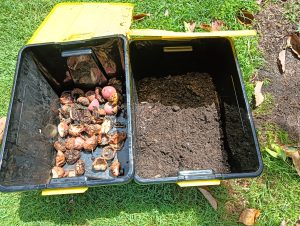
In the first, I used two boxes. One contains the nutrient mix and the other is for the waste. When I have some waste, I put it into the second box and cover it with the nutrient and worm mix from the first box.
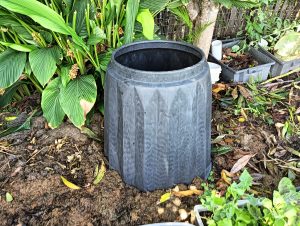
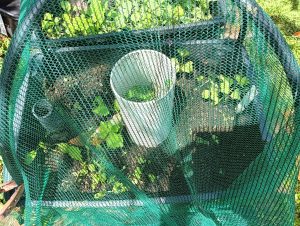 In the second experiment, I went back to an older system – the compost tube.
This is a pipe (about 100 mm diameter) that goes right down to the base of the box. This gives two input pipes: one for the water (or more correctly, soil blood) and one for the organic waste.
When I put any organic waste into the compost tube, I cover it with the nutrient mix and also flush with water. This takes any decomposed material to the bottom of the box where friendly worms kindly distribute it throughout the box.
Easy Access
If I can get enough apartment dwellers to start eating food full of beneficial microbes, this will encourage commercial growers to start producing Wickimix and Gbiota boxes. This will make access available to many more people and reduce the number of people having a foot amputated from diabetes – which is what Gbiota is all about.
Wait and See (Update)
Originally, it was a case of “wait and see”. From the viewpoint of the Gbiota system, both approaches work fine for breeding beneficial microbes. The real question was which is the most user-friendly for an apartment dweller.
Since I wrote that, I have been using compost tubes with great success. I have some boxes near the house that I just toss kitchen waste into – so simple.
I find my favourite yoghurt containers make a really good tight-fitting cap for the tubes to keep out those pesky flies.
Moisture Control, Compost Tubes and Soil Blood
The key to the Gbiota system is controlling the moisture level. If the soil is left full of water for any length of time, harmful microbes will breed.
The swivel tube is used to drain the box. We call the liquid that drains out “soil blood”, as it does the same job as blood does for us – circulating nutrients and oxygen around the body.
If you look at soil blood under a microscope, you see it is full of microscopic creatures.
As the soil blood drains out, it sucks fresh air into the soil. To ensure there is no stagnant water, the box is left for a period after draining.
Organic waste is loaded into the compost tube and capped with Wickimix (or soil) and, if needed, worms – then flooded with soil blood, which pushes the nutrients into the base of the box.
Soil blood can also be applied to the plants as a foliar feed – nutrients and microbes will be absorbed by the leaves.
We apply a fixed volume of soil blood at every irrigation – typically about 15% of the soil volume. We use a highly sophisticated device for this: an old milk bottle. We are into recycling.
We control the amount of water input by varying irrigation times. If I am at home, I will drain shortly after irrigating, but if I need to go away I can leave the draining until I return, which increases the time between irrigations.
Controlling moisture and nutrient levels is the core of the Gbiota system. There are many articles on this website on this topic and I am always writing new ones.
You can always contact me at colin@gbiota.com
Flipping vs Compost Tubes
Flipping, as shown in the videos, was my standard practice. The success of compost tubes means that flipping is almost obsolete for a flat dweller but is still useful for a grower with a garden who is supplying swap-over boxes to other Gbiota growers.
I used to use this flipping technique all the time, but now find I can move the compost tubes from place to place, eventually filling the entire base of the box.
Commercial growers may still use the flipping technique for refurbishing swap-over boxes, but I think most home growers will prefer the compost tube method.
It is also much better for boxes that are too big to flip.
![]()