I have written a lot about the theoretical aspect of growing gut food—now it is time to get down to the nitty-gritties of setting up a Gbiota system.
But just bear with me for a couple of paragraphs while I set the scene.
Be pragmatic
In developing the Gbiota growing system I have had to consider ease of use and strike a balance between what is technically best and what people are actually willing to do in today’s high-pressure lifestyle.
Let us be clear on what we are trying to do: prevent non-infectious diseases.
To do that we must:
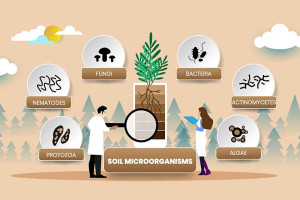
- Breed the beneficial microbes that will end up in our gut, and
- Ensure there is a good supply of minerals—like zinc, which powers our immune system.
The heart of Gbiota is simple: grow food that carries living microbes and minerals our body has evolved to depend on.
Randy lot
There is no problem about breeding microbes—they are a randy lot and breed within about 20 minutes of creation, growing exponentially.
There are just two problems.
If I can demonstrate my knowledge of microbiology—there are just three sorts of bugs:
- Good bugs – keep us healthy
- Dozy bugs – hang out and don’t do much
- Bad bugs – make us sick and can even kill us
Now, being equally knowledgeable on microbiology, you will have worked out that what we want is the good bugs and not the bad bugs.
There is no real way of killing off the bad bugs without killing off the good bugs, so we come to the real essence of the Gbiota system:
Create conditions where the good bugs outcompete the bad bugs so the bad bugs never become a serious hazard.
The second problem is that the good bugs, which we so carefully breed like a prize pet, not only breed very rapidly but also die very rapidly—so the plants must be eaten shortly after harvesting.
Right now the only way you can do this is to grow gut food yourself. In the future I would like to see a local gut-brain food industry, but for now it is up to you.
The basics
I see three levels of Gbiota growing:
- Gbiota pots – regular flower pots stacked to create separate zones, light enough to be easily handled.
- Gbiota boxes – really wicking beds in box form, too heavy to manhandle.
- Gbiota beds – raised beds which require a proper system for managing the water.
All Gbiota systems work on the same principle, but there are many ways this can be applied in practice.
In this article I focus on the simplest system I can imagine—Gbiota pots—to illustrate the core principles. I plan to cover the alternative systems in later posts.
The three zones of a Gbiota pot
They all have three zones:
1. Growing zone
The top zone is where the plants grow. It contains soil loaded with mature organic compost, teaming with microbes, nutrients and minerals.
In my example I use a regular flower pot, which I load with mature Gbiota mix.
Apart from having some of the best soil in the business, this is just regular growing.
I do put some organic waste at the very bottom of the pot, but this is well away from the early root zone and will have pretty much decomposed by the time the roots reach it.

2. Breeding zone
The breeding zone is exactly what it says—the zone where we breed the beneficial microbes that will end up powering our gut-brain.
I use a second flower pot below the growing pot and load it with a combination of kitchen waste and any other organic waste I can lay my hands on—typically a mix of grass clippings and chicken manure.
One practical problem is how to collect and store kitchen waste, which is produced daily and, if left lying about, attracts the blowies and other flies.
I keep a bag of Gbiota soil mix to sprinkle on the surface so it gives a nice, clean cover.
In my locality we have soldier flies which lay eggs that produce soldier fly larvae—excellent decomposers.
We also need worms, which we can easily add as worm eggs; they soon breed up.
I have compost bins in my garden, but people in flats may not have that luxury. Using two pots, it is simple: just lift up the top pot and load today’s kitchen waste into the breeding pot.
It is important to get the nitrogen levels up, so I use fresh chicken manure. That may not be so attractive for flat dwellers, so another trick is to put today’s kitchen waste on a tray with some waste bread or bird seed. Local birds will happily visit and provide a free manure delivery service—no credit card needed.
It is also important to add minerals. I use:
- Crushed rock (cracker dust) used for driveways which, in my area, is largely Bauxite—cheap and rich in magnesium, one of our commonly deficient minerals.
- Biomin, which contains a spectrum of trace elements (including some zinc) but is more expensive.
Blood and bone is good for zinc, which is critical for a healthy immune system (I bet you have forgotten about Covid, but the flu is still here) and it satisfies my obsession with recycling.
This breeding zone will need topping up with fresh organic waste. Using separate pots means all you have to do is lift off the growing pot, make a small hole, and add extra kitchen or organic waste as needed.

3. Catching the run-off
We need to catch the run-off, so we use a third container—a $2 bucket is fine.
Fluid drains down from the top pot, through the second pot, and is caught in the bucket.
Soil blood
You may be tempted to dismiss the water you catch as just dirty water. But look at it under a microscope and you will see it is full of weird and wonderful creatures wriggling away.
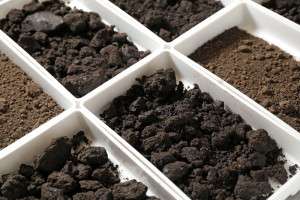
Healthy soil is full of life—from the larger creatures we can easily see, like worms and soldier fly maggots, to smaller creatures we need a microscope for, right down to the most minute—the viruses.
These creatures have guts like us, doing the same job our guts do.
This life is what turns dirt into soil, forming aggregates, giving soil its structure and, ultimately, keeping us healthy.
Technically, I suppose I should call this “compost tea”, but that does not do this magic liquid justice, so I call it soil blood.
In our bodies we have blood carrying sugars for energy, minerals and complex nutrients, as well as the cells that make up our immune system, keeping the baddies at bay.
Plants also have an immune system and a system of making complex chemicals we call phyto-chemicals. This yukky-looking brown fluid is just as valuable to the plant world as blood is to us.
So we want to catch it and reuse it.
We can even boost it by adding blood and bone or Biomin minerals to make it even more potent.
Breathe the soil
The key to getting air into the soil (and avoiding a pongy mess) is to let the soil breathe. We achieve this with flood and drain.
We flood the soil, which expels toxic gases like methane that accumulate during decomposition and act as growth inhibitors. Then we let the soil drain, and as the water drains away it automatically sucks fresh air back into the soil.
Dunk or flush
With a small flower pot, like I am using in this example, it is easy to lift the pot out, dunk it into a container, and let it saturate. It is best to do this slowly so the air has time to escape—if you do it quickly, you will see air bubbling to the surface.
But when you are using bigger boxes, like the basket I will write about shortly, they can get really heavy to lift.
I am a great believer in the phrase “perfection is the enemy of progress”, and I want people to use the Gbiota system, so I must make it as easy to use as possible.
So I have tried simply catching this soil blood, putting it into a watering can (without the rose) and flooding the soil surface so a wave of water flows down through the soil and ends up in the catchment bucket.
This may not be as good technically as the dunk-and-drain method, but it works. And it is easy.
The key is to have a big enough slug of soil blood and apply it fast enough so it totally saturates the surface and reaches the catchment bucket below.
What to grow
Now let us get real here—one bucket is not going to feed an entire family. (The basket, being rectangular, is more productive—see the next post.)
But we are not trying to grow all our food. Despite the howls of protest from dietitians, there is really not that much wrong with supplying our energy needs from Hungry Jacks. But Hungry Jack will not feed our gut-brain—that is what the Gbiota system is all about.
We only need to supply about 5% of our total food intake as Gbiota food.
Growing plants to full maturity can take several months, so you get much more food by growing baby greens, which are often more nutritious and tastier anyway.
I make up a mix of seeds from fast-growing plants like rocket and radish to slower-growing plants like baby broccoli. It may take up to four weeks from germination to first harvest, but then I will have a continuous supply of food for four or more weeks.
We still need more than one bucket. How many depends on the season (how fast plants are growing) and how much organic waste you generate.
As the time from seeding to seeding will be about eight weeks, and most people will want to empty their kitchen waste every week, we are talking about having around eight sets of pots—which will set you back about $24, so a single finger up to the bank manager (do they still exist? Not for much longer with AI).
Here is a cartoon series for the process.
![]()